How to annotate keypoints in DataTorch
Five steps from an empty project to a COCO keypoint export: define the schema on a label, click the points in order, mark the ones you cannot see, fix mistakes, export. About twenty minutes the first time, with a free account.
New to the terms? Read what keypoint annotation is first. You need a project with at least one image uploaded to a dataset. Everything below works on the Free plan.
01
Create a label and give it a keypoint schema
Open your project and go to Labels in the sidebar. Click New Label, give it a name (for example person) and a color, then Create. The create form has no schema fields, so the keypoints go on in a second pass: tick the new label in the list, click the pencil icon Edit label, and in the Update Label dialog expand more options. The Metadata editor that appears takes a JSON object with two keys.
keypoints is the list of point names, and its order is the order you will click them in. skeleton is the list of pairs to draw bones between, using 1-based positions in that list, the same convention as COCO. A four-corner schema looks like this:
{
  "keypoints": ["top_left", "top_right", "bottom_right", "bottom_left"],
  "skeleton": [[1,2], [2,3], [3,4], [4,1]]
}
For human pose, paste the COCO person schema. It exports as a COCO category without any renaming:
{
  "keypoints": [
    "nose", "left_eye", "right_eye",
    "left_ear", "right_ear",
    "left_shoulder", "right_shoulder",
    "left_elbow", "right_elbow",
    "left_wrist", "right_wrist",
    "left_hip", "right_hip",
    "left_knee", "right_knee",
    "left_ankle", "right_ankle"
  ],
  "skeleton": [
    [16,14],[14,12],[17,15],[15,13],
    [12,13],[6,12],[7,13],[6,7],
    [6,8],[7,9],[8,10],[9,11],
    [2,3],[1,2],[1,3],[2,4],
    [3,5],[4,6],[5,7]
  ]
}
Click Update. Fix the schema now rather than later: every saved annotation stores its points in this order, so inserting a name mid-dataset shifts every coordinate after it.
02
Open an image and pick the label and the tool
Open an image from the dataset. In the annotator, the chip in the top-right corner of the menu bar shows the Current label. Click it, or press W, and choose your keypoint label. Pick it explicitly: when nothing is selected the tool falls back to the label of the last annotation, which is rarely the one you want. Then click the Keypoints tool in the left toolbar, the map-marker icon in the create group. If the annotator opens the label picker instead, it had no label to work with: choose one and the tool activates.
03
Click the points in order
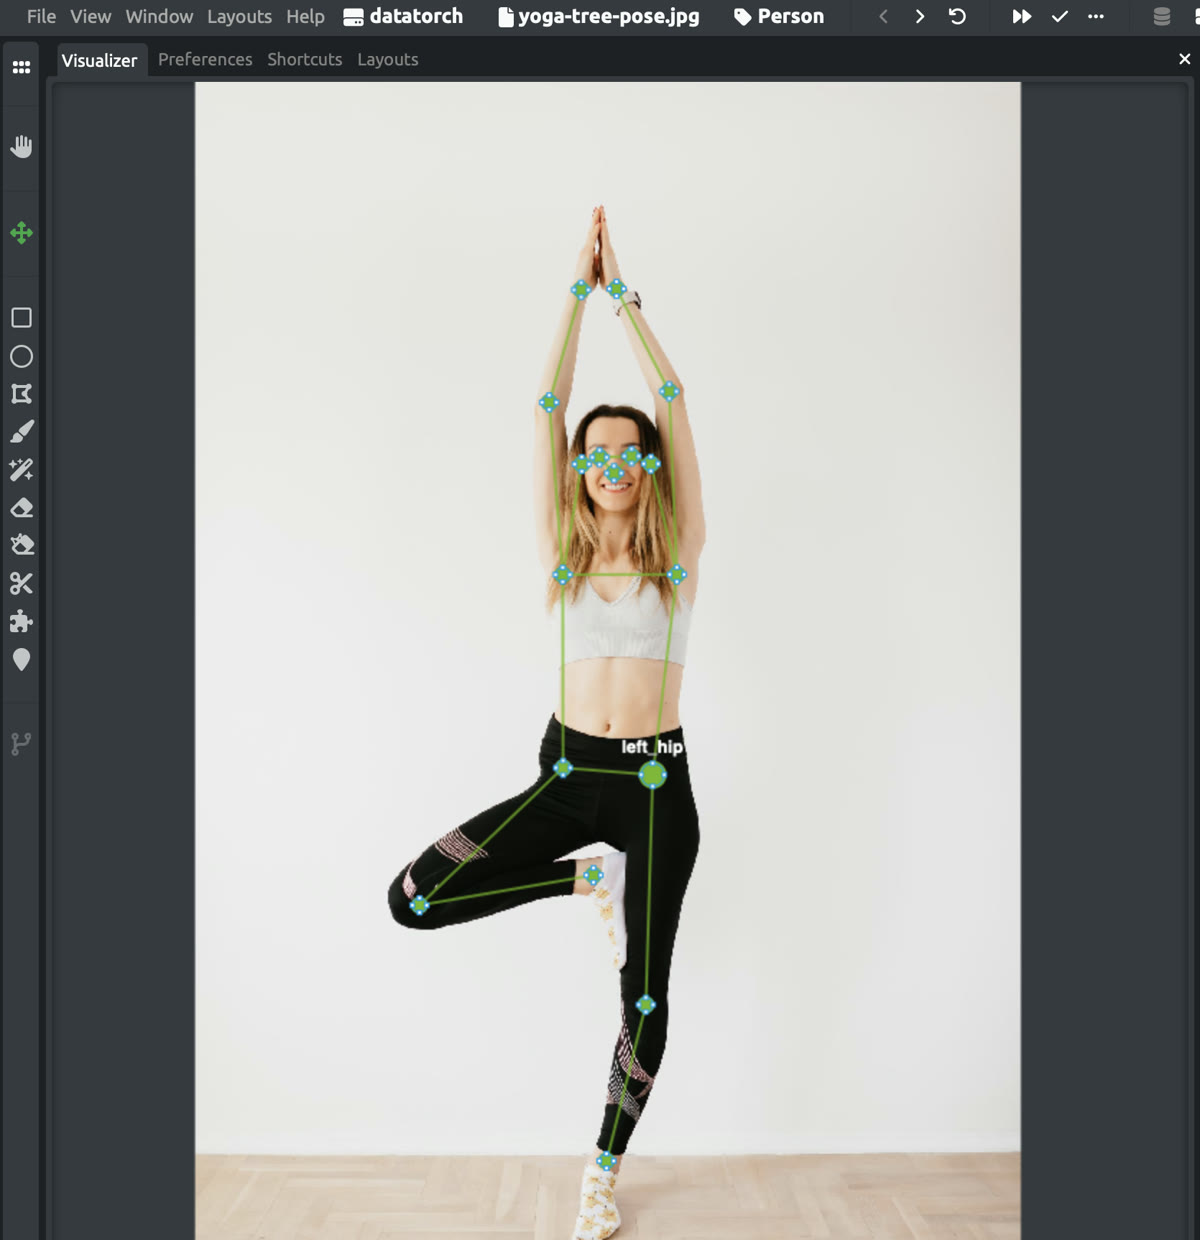
With the tool active, the name of the next keypoint is written just above the cursor, starting with the first name in your list. Click where that landmark is and the name advances to the next one. Bones appear as soon as both of their endpoints exist, so the skeleton builds up while you work. If you need to adjust a point, keep the mouse button down and drag before releasing.
For a landmark that exists but is hidden (a hip under a coat, a wrist behind the back), hold Shift while clicking where you estimate it to be. That stores COCO visibility 2, labeled but occluded, and draws the point as a hollow circle. A plain click stores visibility 1, visible. Every name in the schema must be placed before the annotation completes, there is no skip, so Shift+click is also how you handle points that are off the edge of the image: put them at the border.
After the last point the annotation saves on its own, appears in the Stack panel, and the cursor label returns to the first name, ready for the next person. Remember that left_* means the subject's left: on someone facing the camera it is on your right.
04
Fix a point, move a skeleton, or delete
Switch to the Move tool with S. Hover any keypoint and it grows and shows its name, which is the fastest way to audit a left/right mix-up. Drag a point to move just that joint. Drag a bone to move the whole skeleton, for example when an imported annotation is offset by a few pixels.
Click a skeleton to select it, Shift+click to add or remove others, or drag a rectangle on empty image to select everything inside. Delete removes the selected annotations (on a Mac laptop keyboard use fn+delete), and Ctrl+Z undoes. Deletion is per annotation, not per point: to redo one bad skeleton, delete it and place it again. Visibility is also fixed at placement, so a point that should have been occluded means re-placing that skeleton.
05
Export to COCO
Go to Exports in the sidebar and click New Schema. Name it, set Format to COCO, choose which datasets, labels and files to include, and Create. On the schema page click Run Export, then Download when the run finishes. The JSON has your schema on the category and the points on each annotation:
{
  "categories": [{
    "id": 1, "name": "person",
    "keypoints": ["nose", "left_eye", ...],
    "skeleton": [[16,14], [14,12], ...]
  }],
  "annotations": [{
    "image_id": 1, "category_id": 1,
    "keypoints": [412, 96, 2, 420, 88, 2, 404, 88, 2, ...]
  }]
}
Two things to know before training: the export does not write num_keypoints, and an annotation that is only keypoints has an empty bbox. If your trainer needs both, draw the bounding box first, keep that annotation selected, and place the keypoints: they attach to the same annotation and export together.
Troubleshooting
The cursor says "no keypoints" in red
The current label has no keypoints array in its metadata. Check you selected the right label, and that the JSON on the Labels page saved (invalid JSON fails silently: re-open more options and look).
I changed the schema but the annotator still shows the old names
Labels load when the annotator opens. Reload the annotator tab after editing metadata on the Labels page.
Importing a COCO file kept my old skeleton
The importer only writes keypoint metadata onto labels it creates. If a label with the same name already exists, set its Metadata to match the file before importing, or delete the label first.
How do I import existing COCO keypoints?
On the dataset page click Import annotations, choose COCO, and drop the JSON file. Images are matched by file_name, so upload the images first. Use this uploader rather than the Python CLI import, which does not carry keypoints.
The COCO keypoint format
All 17 person keypoints in order, 0-based versus 1-based ids, the skeleton pairs and the visibility flags your export uses.
COCO keypoint referencePractice on a public keypoint dataset
Downloadable keypoint datasets hosted on DataTorch, plus the standard pose benchmarks with sizes and keypoint counts.
Browse keypoint datasetsFree plan, private project, no card.
Create a project, upload a few images, paste the schema above onto a label, and you are placing keypoints in a few minutes.

Tools and community for image annotation: label, review, and share datasets, from everyday photos to the imagery only specialists can read.
© 2026 DataTorch. All rights reserved.